Cluttered cords, scattered accessories, and messy entryways can turn even the cleanest space into visual chaos.
That’s where clever, damage-free solutions come into play—especially for renters or anyone avoiding holes in the wall.
Command hooks offer a surprisingly versatile way to solve everyday storage issues while keeping your home stylish and tidy.
Whether it’s organizing kitchen tools, streamlining your bathroom essentials, or setting up a neat charging zone, these ideas make practical upgrades simple and accessible.
If you’re looking for budget-friendly, renter-safe hacks that actually work, the following command hook ideas will completely change how you approach home organization.
Under-Desk Cable Management

Tangled cords and scattered power strips can turn any workstation into a chaotic mess. A practical fix starts with command hooks strategically placed along the underside of your desk.
By adhering small or medium-sized hooks in a line or curve, you can route USB cables, chargers, and power cords neatly, avoiding floor clutter and tripping hazards. This method not only keeps cables off the ground but also simplifies unplugging and switching devices as needed.
Use hooks with strong adhesive designed to hold up to two pounds for heavier cords or adapters. For laptops, keep the charging brick mounted discreetly using larger adhesive hooks or paired strips. Color-matching hooks to your desk ensures a clean, unobtrusive look.
Labeling the cords above each hook also helps reduce guesswork when multiple gadgets are in use. If your desk setup includes a surge protector or power bar, mount it beneath the desktop surface using larger hooks to free up floor space entirely.
This setup encourages a safer and more organized work environment. Whether for a home office or study nook, this command hook technique promotes cable hygiene while keeping your workspace looking intentional and streamlined without tools or permanent installations.
Vertical Kitchen Storage

Limited cabinet space can lead to countertop chaos in busy kitchens. With command hooks, it’s easy to use underutilized vertical areas like backsplash tiles, cabinet sides, or the inside of pantry doors for smart, space-saving storage. Hang lightweight utensils, oven mitts, or small baskets on adhesive hooks for quick and accessible organization.
Clear up drawers by hanging measuring spoons, peelers, and whisks where you can see them. Arrange hooks in staggered heights to accommodate items of varying sizes, ensuring efficient use of space. To avoid surface damage, always opt for hooks safe for painted or tile walls and rated for kitchen humidity levels.
Consider mounting hooks inside cabinet doors to suspend spice racks, cutting boards, or even cling film holders. For renters or those avoiding permanent changes, this solution avoids drilling while still offering structure and style. Group related items—such as coffee accessories near your brew station—so your workflow becomes more intuitive.
Wipe surfaces clean before applying for optimal adhesion, and allow hooks to set before adding weight. With thoughtful placement, this easy hack instantly frees up drawers and counters while improving overall kitchen flow—making meal prep, cleanup, and cooking feel more manageable in even the smallest culinary spaces.
Bathroom Accessory Holder

Cluttered bathroom counters can quickly overwhelm your daily routine. To reclaim space and streamline essentials, use command hooks to set up a flexible accessory system that keeps grooming tools, towels, and toiletries organized and in reach. Attach small baskets or pouches to hooks mounted on walls or cabinet sides, turning underused areas into functional storage.
Hairdryers, straighteners, and curling irons can be hung by their loops or cords, keeping them untangled and off the vanity. Ensure you choose moisture-resistant hooks designed for bathrooms to maintain strong adhesion in humid conditions. Installing them near outlets makes it easier to plug in and use appliances without hassle.
Hooks also work well for face towels, loofahs, and even jewelry trays when mounted near the sink or mirror. For shared bathrooms, assign specific areas or colors for each user to reduce mix-ups. Adhesive hooks offer the freedom to customize layouts as your needs evolve—without damaging tiles or requiring tools.
Before sticking, clean the surface thoroughly and wait 24 hours before applying weight. This easy solution brings order to the chaos, helps prevent water damage to items left on the counter, and maintains a polished look even in the busiest of bathrooms.
Entryway Key Organizer

Rummaging through bags or pockets for house keys wastes time and adds unnecessary stress. A simple, sleek solution is to install a row of command hooks near your door to create a designated key-drop zone. This instantly builds a habit of placing keys in the same spot, cutting down on last-minute searches.
Choose hooks that complement your wall color or decor style for a seamless, integrated look. You can assign each hook to different family members or uses—house, garage, car, mailbox—to keep everything in order. Small adhesive labels above each hook can help with identification without crowding the space.
For added functionality, consider using a small hanging basket or clip-style hook to hold sunglasses, lanyards, or even incoming mail. Hooks can be mounted on entryway walls, behind doors, or on narrow side panels without needing nails or screws, making them ideal for renters.
Ensure the surface is dry and smooth before application for the best grip. Once installed, the system is sturdy and easy to adjust if needed. This quick setup not only simplifies your daily exit and return but also promotes a cleaner, more organized entry space that greets you with function and calm.
DIY Charging Station

Messy charging cords and scattered devices can turn nightstands or kitchen counters into tech zones gone wrong. A custom charging station using command hooks offers a tidy fix—no tools or drilling necessary.
Begin by selecting a flat wall or the side of a console table. Install a power strip close by, then position hooks vertically or horizontally to route cables.
Attach each hook to guide the cords neatly toward specific device slots. Use medium to large-size hooks for tablets or heavier phones and smaller ones for standard charging cables. Some users attach hooks directly to drawer sides or shelving interiors to keep cords hidden when not in use.
Add labeled tags or color-coded ties to make cable identification easier, especially when multiple devices share the space. Hooks can also hold lightweight charging cradles or fabric pouches for phones and earbuds while they power up.
Ensure a clean, dust-free surface before applying for best adhesion. Wait several hours before loading weight onto the hooks to maximize hold. This setup is ideal for entry consoles, desk corners, or bedroom walls, offering a clean and functional solution that keeps cords from tangling and your devices safely docked—making charging less of a chore and more of a system.
Closet Door Jewelry Display

Necklaces tangled in drawers and earrings missing their pair can turn getting ready into a frustrating task. One simple yet effective solution involves using command hooks on the inside of a closet door to organize and display your entire jewelry collection. This method not only saves space but also makes accessories more visible and easier to access while selecting outfits.
Use small clear hooks arranged in rows or staggered columns to hold necklaces, bracelets, and hoop earrings.
For stud earrings, attach a thin mesh or corkboard with command strips and use it as a dedicated backing. Hooks with metal finishes or minimal designs can double as functional and aesthetic additions.
Measure spacing carefully to prevent items from overlapping or tangling. Apply hooks at varying heights to accommodate different lengths of jewelry. Always clean the door surface thoroughly before applying, and allow proper curing time for maximum hold.
This approach is renter-friendly and fully reversible, making it ideal for shared closets, dorms, or temporary setups. No drilling, no tools—just a clean, easy-to-navigate jewelry station right where you need it.
With everything displayed neatly, accessorizing becomes quicker and more enjoyable, all while keeping your favorite pieces safe from damage and disorganization.
Pantry Bag Organizer

Plastic and reusable grocery bags often end up stuffed into corners, creating clutter in pantries or kitchen cabinets. A low-effort way to tame the mess is by using command hooks to set up a streamlined bag organizer inside a pantry door or side wall.
Attach a medium-sized fabric tote or soft container using two sturdy adhesive hooks to hold dozens of bags in one accessible spot.
For those who prefer structure, mount individual hooks spaced vertically and hang rolled-up reusable bags by their handles. This method helps sort them by size or use, such as insulated, fabric, or produce bags.
Opt for hooks that support light to medium weights and can hold securely on painted wood, laminate, or tile.
Install at chest or eye level for easy reach, especially in high-traffic households. Always clean the surface thoroughly before attaching for better adhesion. Hooks can also be used to hang small mesh bags that store onions, garlic, or potatoes, keeping pantry shelves more organized.
The system works well in even the smallest kitchen spaces and can be adjusted or removed as your needs change. Efficient and affordable, it makes bag storage less of a headache while freeing up valuable cabinet and drawer space.
Garage Tool Rack

Piles of scattered tools make garages hard to navigate and increase the risk of misplacing essential equipment. To gain back control and visibility, arrange command hooks on an empty wall to create a flexible, tool-specific hanging system. This avoids heavy installations while still supporting a well-organized setup for light to medium hand tools.
Start by grouping similar items—screwdrivers, wrenches, pliers—and assigning each group a hook section. Use hooks rated for heavier loads when hanging items like drills or small saws. Label each hook’s section or use color-coded grips to make retrieval faster during tasks.
Apply the hooks to a clean, dry surface and allow time for curing before hanging anything. If wall studs are unavailable or you’re renting, this method provides a safe alternative to mounted racks or pegboards. Hooks can also be attached inside cabinet doors or on the sides of shelving units for added versatility.
For gardening supplies like gloves, pruning shears, or extension cords, larger adhesive hooks are excellent for taming bulky or coiled items. This setup not only improves workflow in your garage but also prevents rust, tripping hazards, and misplaced tools—keeping your workspace safe, functional, and clutter-free year-round without permanent modifications.
Laundry Room Sorting System

Overflowing baskets and mixed-up laundry can turn wash day into a major hassle. A more efficient system begins by using command hooks to organize hampers, bags, or mesh totes on the wall for pre-sorting clothes.
Assign each hook to a specific laundry type—whites, darks, delicates—so sorting happens in real time.
Space-saving and renter-friendly, this approach eliminates the need for bulky floor bins and keeps laundry visibly categorized.
Medium to large hooks can hold drawstring bags or hanging hampers, freeing up floor space while encouraging better laundry habits. Mount them near your washer or on the back of the laundry room door for easy drop-ins.
Add labels or color-coded markers to each hook to avoid confusion and streamline the process further. Hooks also work well for hanging drying racks, lint rollers, or lightweight ironing accessories.
Just be sure to clean the wall or cabinet surface before applying, and follow weight guidelines for safe use.
Especially helpful in small laundry areas or apartments, this method improves function without any hardware or drilling.
With everything in its place and easily accessible, the chaos of laundry day becomes more manageable and less time-consuming—allowing you to maintain an organized and productive wash routine.
Temporary Holiday Decor

Seasonal decorations often present a dilemma—how to hang lights, garlands, or wreaths without damaging walls or furniture. Command hooks offer a mess-free and reliable alternative that makes temporary decorating easy and stress-free.
Whether it’s string lights around windows, stockings on a mantel, or wall-mounted decor, these hooks can handle a variety of surfaces.
Use small clear hooks for fairy lights or garlands, and heavier-duty versions for wreaths or hanging ornaments.
Before placing, ensure the surface is dust-free, and let the adhesive set as directed to avoid slippage. For items with loops or wires, command clips provide additional control and stability.
Plan your layout before sticking to avoid misalignment and reduce repositioning. When the season is over, removal leaves no residue or wall damage—ideal for renters or those with painted or delicate surfaces.
This solution also works on glass, wood, and metal, offering flexibility for indoor displays across any room.
Whether decorating for winter, birthdays, or school events, this method allows for personalized touches without permanent changes. Reliable, reusable, and fuss-free, it ensures your home looks festive while protecting walls and maintaining a clean aesthetic once decorations come down.
Bedroom Headphone Holder

Headphones left on nightstands or tangled in drawers can lead to unnecessary wear and clutter. A more efficient solution involves using command hooks to keep them easily accessible and neatly stored.
Mount a single medium-sized hook on the wall beside your bed or desk to hold over-ear headphones securely. For earbuds or smaller accessories, consider placing multiple hooks in a row or using a hook-and-loop system with adhesive backing.
Select a hook style that matches your room’s decor—matte black or metallic finishes work well for a clean, modern touch. Proper surface preparation is crucial: clean the wall with isopropyl alcohol and let it dry before applying the hook. Allow time for the adhesive to bond before hanging your device.
This small adjustment helps protect your headphones from being knocked off surfaces or damaged by spills. It also frees up limited tabletop space, especially in compact bedrooms or shared rooms.
For added convenience, install near a charging port or cable path so your headphones stay ready for use.
Ideal for music lovers, gamers, or remote workers, this quick solution supports daily organization with no tools required. It turns an often-overlooked item into a functional part of your bedroom setup while promoting better care and accessibility.
Craft Room Ribbon Organizer
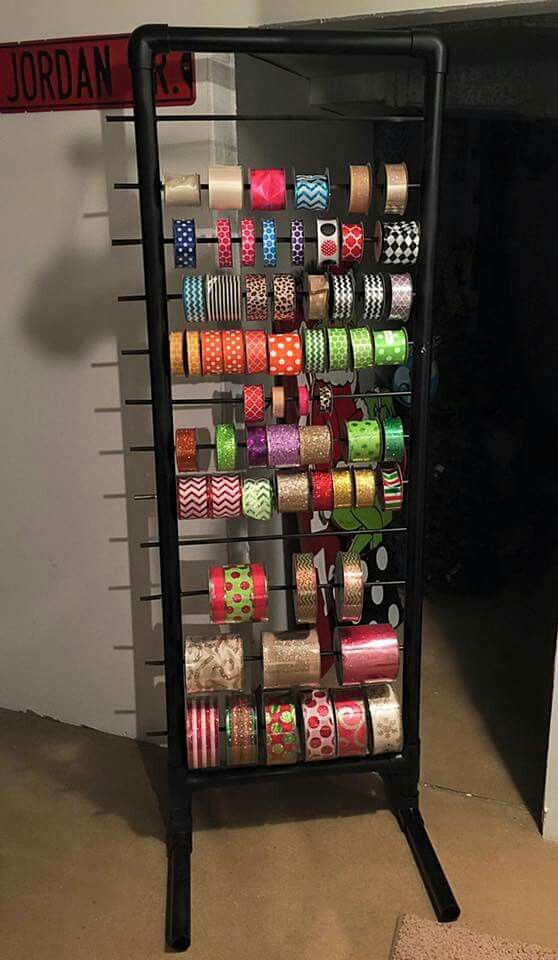
Jumbled ribbon spools can quickly overwhelm a creative workspace, making crafting more frustrating than fun. With command hooks, setting up a tidy, wall-mounted ribbon organizer takes just minutes and keeps your materials easily visible.
Start by installing two parallel hooks on the wall or side of a cabinet and run a wooden dowel through multiple spools. Rest the dowel ends on the hooks to create an instant ribbon rack.
Space the hooks according to the dowel’s length, ensuring even support and smooth rotation when pulling ribbon. For shorter spools, multiple smaller rods stacked vertically work well, each held by its own hook pair.
If you prefer individual access, mount small hooks directly under shelves and hang single spools by their centers.
Use hooks rated for lightweight loads, and clean surfaces thoroughly before application to ensure a strong hold. This method prevents tangling, saves drawer space, and makes colors or patterns easier to browse while working on projects.
Perfect for sewing rooms, paper craft stations, or gift wrapping corners, this setup offers a clean, customizable way to organize your ribbons while maintaining a polished workspace. You can easily adjust it as your collection grows, all without putting holes in the wall.
Window Curtain Tiebacks

Letting natural light flow freely into a room often requires simple, accessible curtain solutions. Command hooks make excellent tieback holders without damaging walls or window frames.
Install one on either side of the window, a few inches outside and below the midpoint of the curtain height, to hold decorative rope, ribbon, or fabric loops that gently pull back panels during the day.
Select hooks with a finish that blends well with your curtain hardware—brushed nickel, bronze, or clear plastic for minimal visibility.
For heavier drapes, medium-sized hooks offer better support without compromising safety. Be sure to clean the wall with rubbing alcohol before application and press firmly to activate the adhesive.
This arrangement adds subtle visual structure to your window area while remaining fully removable. You can swap out the tieback material seasonally or coordinate it with different room accents, allowing for both function and flexibility.
Especially beneficial in rental homes or temporary setups, this approach eliminates the need for drilled hardware while achieving a neat, light-friendly look. It provides a reliable way to keep curtains neatly arranged without sacrificing wall integrity or room style—ideal for bedrooms, living rooms, or home offices alike.
Refrigerator Utensil Holder

Limited counter and drawer space can make small kitchens feel even more cramped. For quick access to lightweight utensils, consider transforming the side of your refrigerator into a vertical storage solution using command hooks. Attach a set of small to medium hooks to the fridge exterior or nearby wall to hang measuring spoons, spatulas, or frequently used tools.
Metal-compatible adhesive options ensure a secure grip on refrigerator surfaces. Always clean the area thoroughly with alcohol and allow it to dry before applying. Avoid placing hooks near vents or high-heat areas where adhesive may weaken over time.
Group similar tools together and use labeled loops or color-coded holders for efficient sorting. Hooks can also support small mesh caddies or baskets to store garlic presses, peelers, or tea strainers—keeping everything within arm’s reach during meal prep.
This arrangement helps declutter drawers, reduce utensil overlap, and maintain a smoother cooking routine. Ideal for galley kitchens, studio apartments, or shared living situations, it provides structure without committing to permanent fixtures. When no longer needed, the setup removes cleanly, leaving no residue behind.
Functional, renter-friendly, and highly adaptable, this quick hack adds vertical utility to underused surfaces—streamlining everyday tasks and maximizing kitchen efficiency.